


Printer Setup Guide - Mac Installation
Hey legends! This guide is for Mac users to set up your TSC Printer.
Visual learner? Watch the full installation guide below
Step 1: Download your drivers
- Click the link here.
- Right click to download the entire TSC MAC Driver folder as shown here:

Step 2: Drag and drop to your applications folder
- In your Downloads folder, double-click on the .ZIP file, this will give a TSC Mac Driver folder
- Drag and drop the TSC Mac Driver folder into your Applications folder as shown below
- IMPORTANT: if the folder containing both files is not under Applications, you won't be able to complete the installation.

Step 3: Install the application
- From your Applications folder, double click on the Mac TSC Setup.pkg file.


- Click Continue and then the Install button.
- Installer requires your user authentication to install the application. This is either your username and password (the same as your login), or if you have TouchID enabled, just use your finger!
- Installation should then be complete.
Getting this error? Don't worry, this is totally normal for third-party apps!

To bypass this:
- Go to System Settings, then Privacy & Security. Handy shortcut: search for 'Privacy & Security' via Spotlight in the top right corner of your screen.
- Scroll all the way down until you reach the ‘Security’ section.
- Select 'Open anyway' as circled below, and confirm by clicking ‘Open’ again.

- The Mac TSC Setup.pkg file should launch automatically. But if it doesn’t, you can go back to the Applications folder and double click on the Mac TSC Setup.pkg file once more.
- Click Continue and then the Install button.


Step 4: Add your printer
- For this step, you will need your printer turned on and connected via USB, if you haven't already.
- Head back to System Settings, scroll all the way down and select Printers & Scanners.
- Click the Add Printer, Scanner or Fax… button

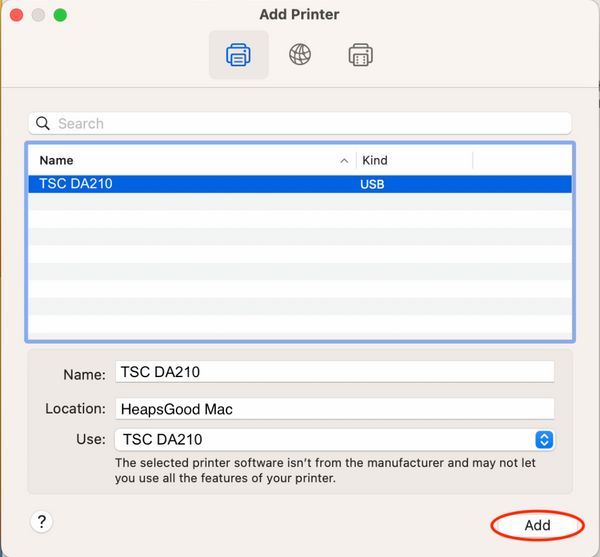
- Select the TSC printer from the list, and in the bottom box labelled 'Choose a driver’ select ‘Other’.

- Click ‘Applications’, navigate to the TSC Mac driver, and then select the DA210.ppd file

- Click ‘Add’.
-
If your system shows the repair box below, that's okay! Just select ‘Repair’.

- Your printer should now be fully installed and showing in your printer list.

Step 5: Set your label size (for A6 Shipping Ecolabels)
Using our DIY Ecolabels? Click here instead for label set up.
- Open any photo or PDF file using Preview

- Go to File > Print
- Select TSC DA210 from the printer list
- Under the Paper Size section, select Manage Custom Sizes…

- Click the + button to add a new paper size, double click on it so you can rename the paper size as ‘Shipping Labels’, and fill in the details as below

- When done, select ‘OK’.
Step 6: Test print your label!
- Use your preferred courier company from your web browser or any other
application. This screenshot below is using Eparcel.

- Remember to select the Paper Size on your first print
- IMPORTANT: You may also need to adjust the settings in your courier companies platform. Ensure your label size is set to A6. See the MyPost business example below.

Handy tips:
Installing your labels
- Remove the sticker from the label roll and unravel the roll a little bit. This way, you can install the roll so that the labels are on the top (you should be able to see the printed labels as they come out of the printer).
- Use your thumb to pull the right side away – making space to install the roll:

- Place the roll inside, with the label facing up towards you.

- Close the lid firmly with part of the first label sticking out.

- Push the feed button on the lid (the button on top of the printer). The machine will detect the label size, and move to the start of the next label.

Setting up and troubleshooting your DIY Ecolabels:
Click here for our DIY Ecolabel Guide.
Your TSC Printer is now ready to, well... print!
If you have any questions that aren't answered in the guide above, just send us an email at hello@heapsgoodpackaging.com.au. For anything complex, we'll book you in for a support call and walk you through it.